Level Up Your Skills: Complete Git Guide for Webmasters

1. Introduction: Why Webmasters Need Git in 2026
Picture this: you've spent a week working on a new landing page, decided to "quickly fix" one CSS file, and everything broke. The navigation shifted left, the signup form disappeared, and the mobile version turned into a mess. You frantically press Ctrl+Z, but there were too many changes. The working version is lost. And you need to finish all the work today.
Sound familiar? This is the classic pain of a webmaster working without version control.
Git solves this problem once and for all. It's not just a tool for programmers—it's insurance for anyone working with website code. Statistics show that over 90% of developers use Git daily, but many webmasters still work the old way: copying folders, creating files like index_final_FINAL_v3_REALLY_LAST.html, and praying nothing breaks.
In this guide, we'll cover Git from scratch—from installation to real-world scenarios. No technical jargon, just what a webmaster actually needs for daily work.
2. What is Git in Simple Terms
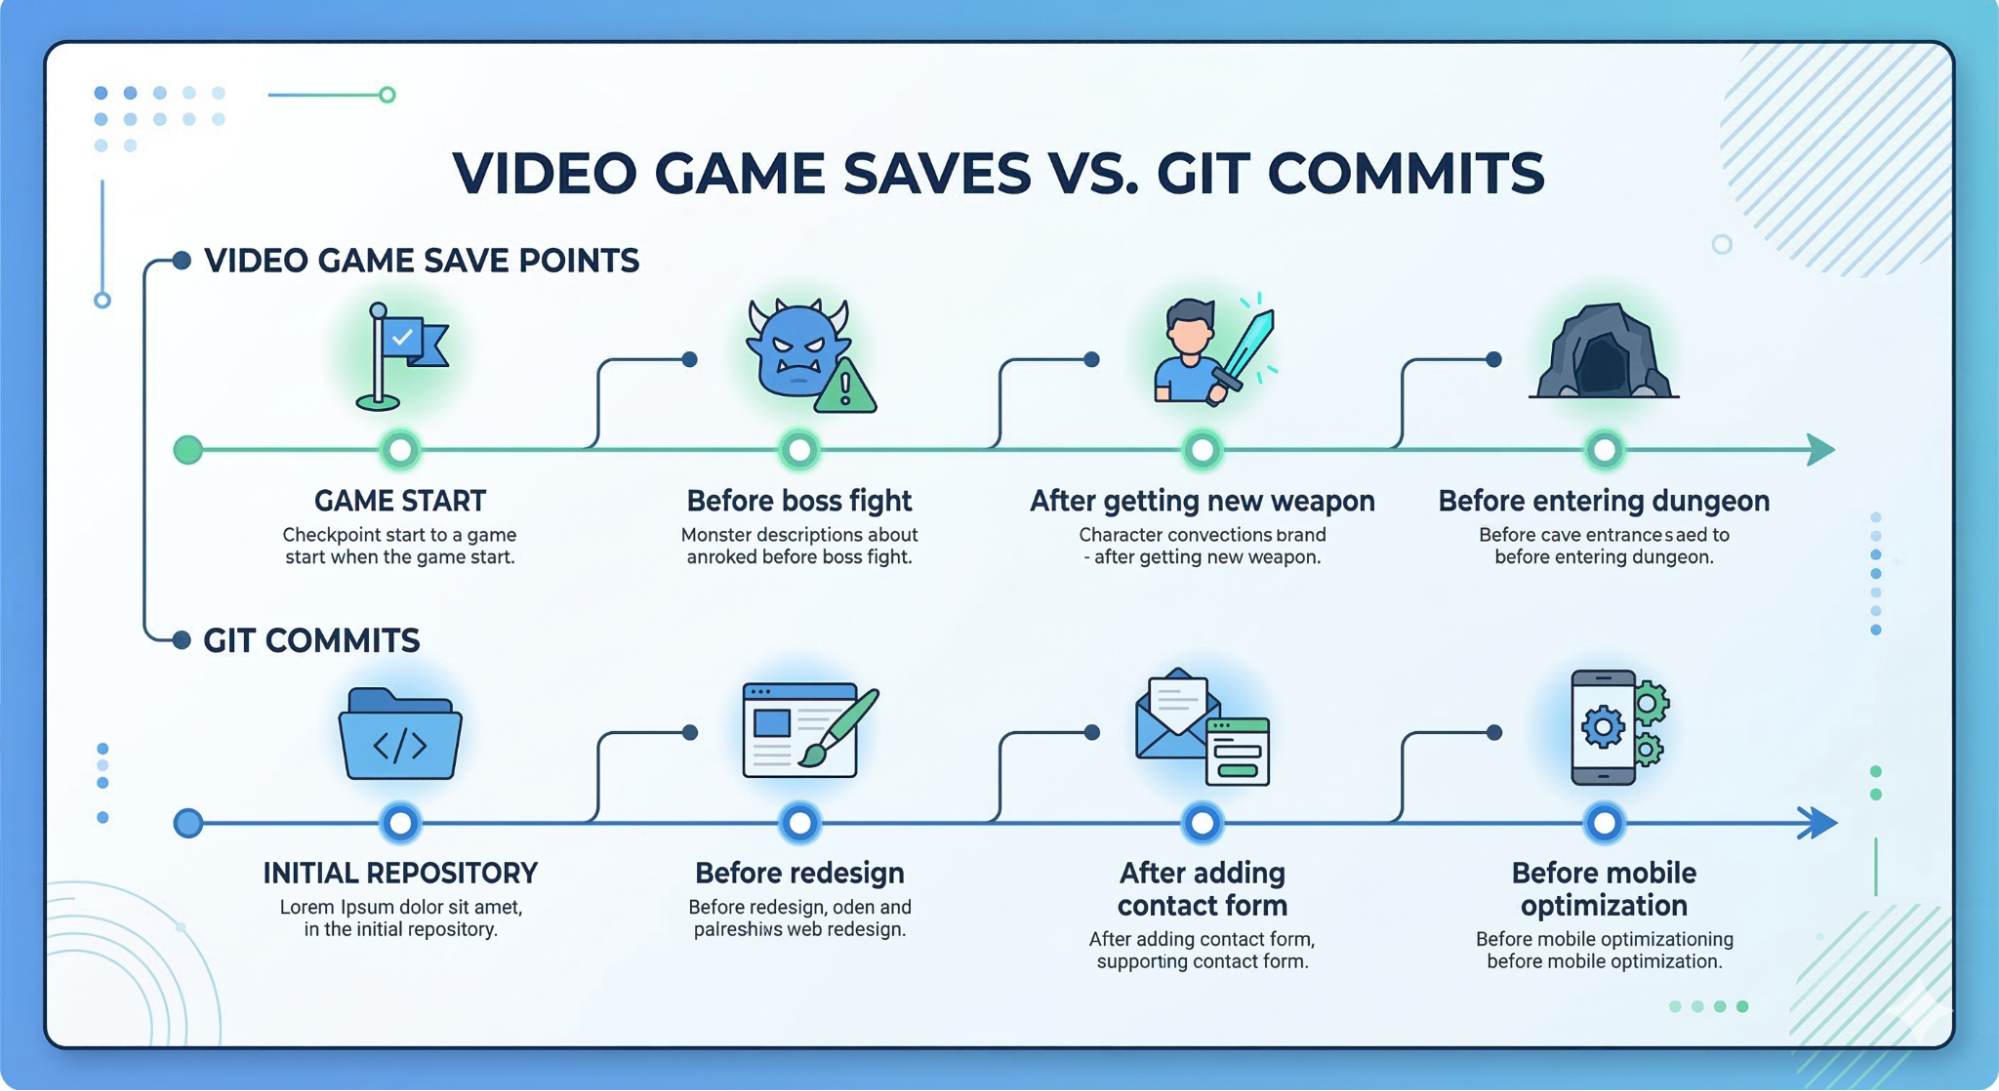
2.1. The Video Game Save Analogy
Remember how in games you save before a tough boss fight? Lost the battle—loaded the save and tried again. Git works exactly the same way, just for your code.
Git is a "save system" for your website, where:
- Each save (commit) is a snapshot of your project at a specific moment
- You can return to any save at any time
- You see the complete history: what, when, and why things changed
- You can create parallel "saves" (branches) for experiments
2.2. How Git Differs from Folder Chaos
The classic webmaster approach without Git looks like this:
📁 landing-page/
📄 index.html
📄 index_backup.html
📄 index_backup_17_03.html
📄 index_FINAL.html
📄 index_FINAL_v2.html
📄 index_REALLY_LAST.html
📄 index_test_new_design.html
📁 css/
📄 style.css
📄 style_old.css
📄 style_backup_work.css
Problems with this approach:
- Unclear which version is current
- Can't see what exactly changed between versions
- Takes up lots of disk space
- Easy to get confused and accidentally delete the right version
- Impossible to work in a team
With Git it looks like this:
📁 landing-page/
📄 index.html
📁 css/
📄 style.css
📁 .git/ ← all the magic is here
All versions are stored in the hidden .git folder, and you only work with current files. Yet you can:
- View any previous version
- Compare changes between versions
- Roll back to any point in history
- See who changed what and when
2.3. Key Terms for Beginners
Let's break down the basic concepts through simple analogies:
Repository — a folder with your project under Git control. Think of it as a library of all versions of your site.
Commit — a "save" of changes with a description of what you did. Like a diary entry: "March 17, added contact form."
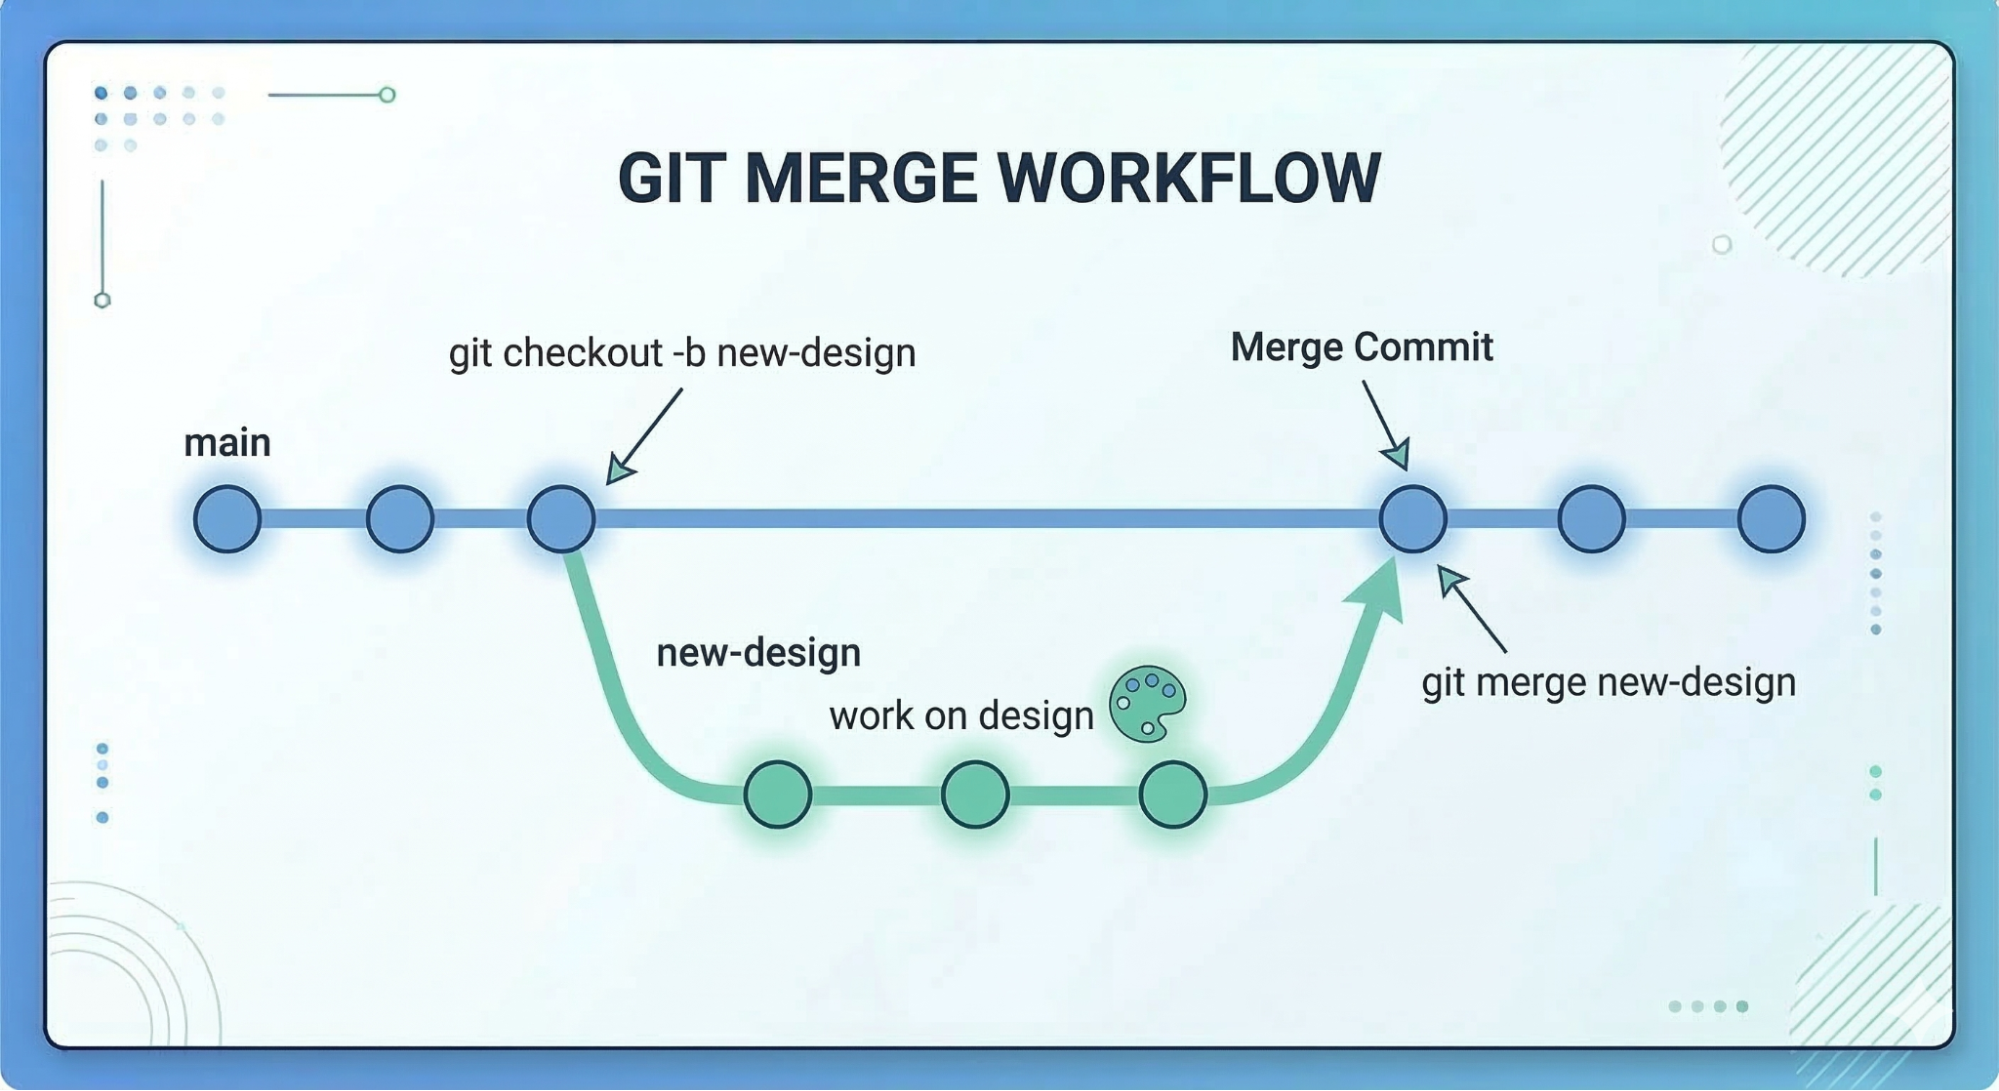
Branch — a parallel version of the project for experiments. The main branch (usually called main or master) is the working version of your site. Create a new branch—get a copy for experiments without touching the original.
Merge — combining changes from one branch to another. Tested a new design in a separate branch, liked it—merged into main.
3. Why Webmasters Need Git: Practical Scenarios
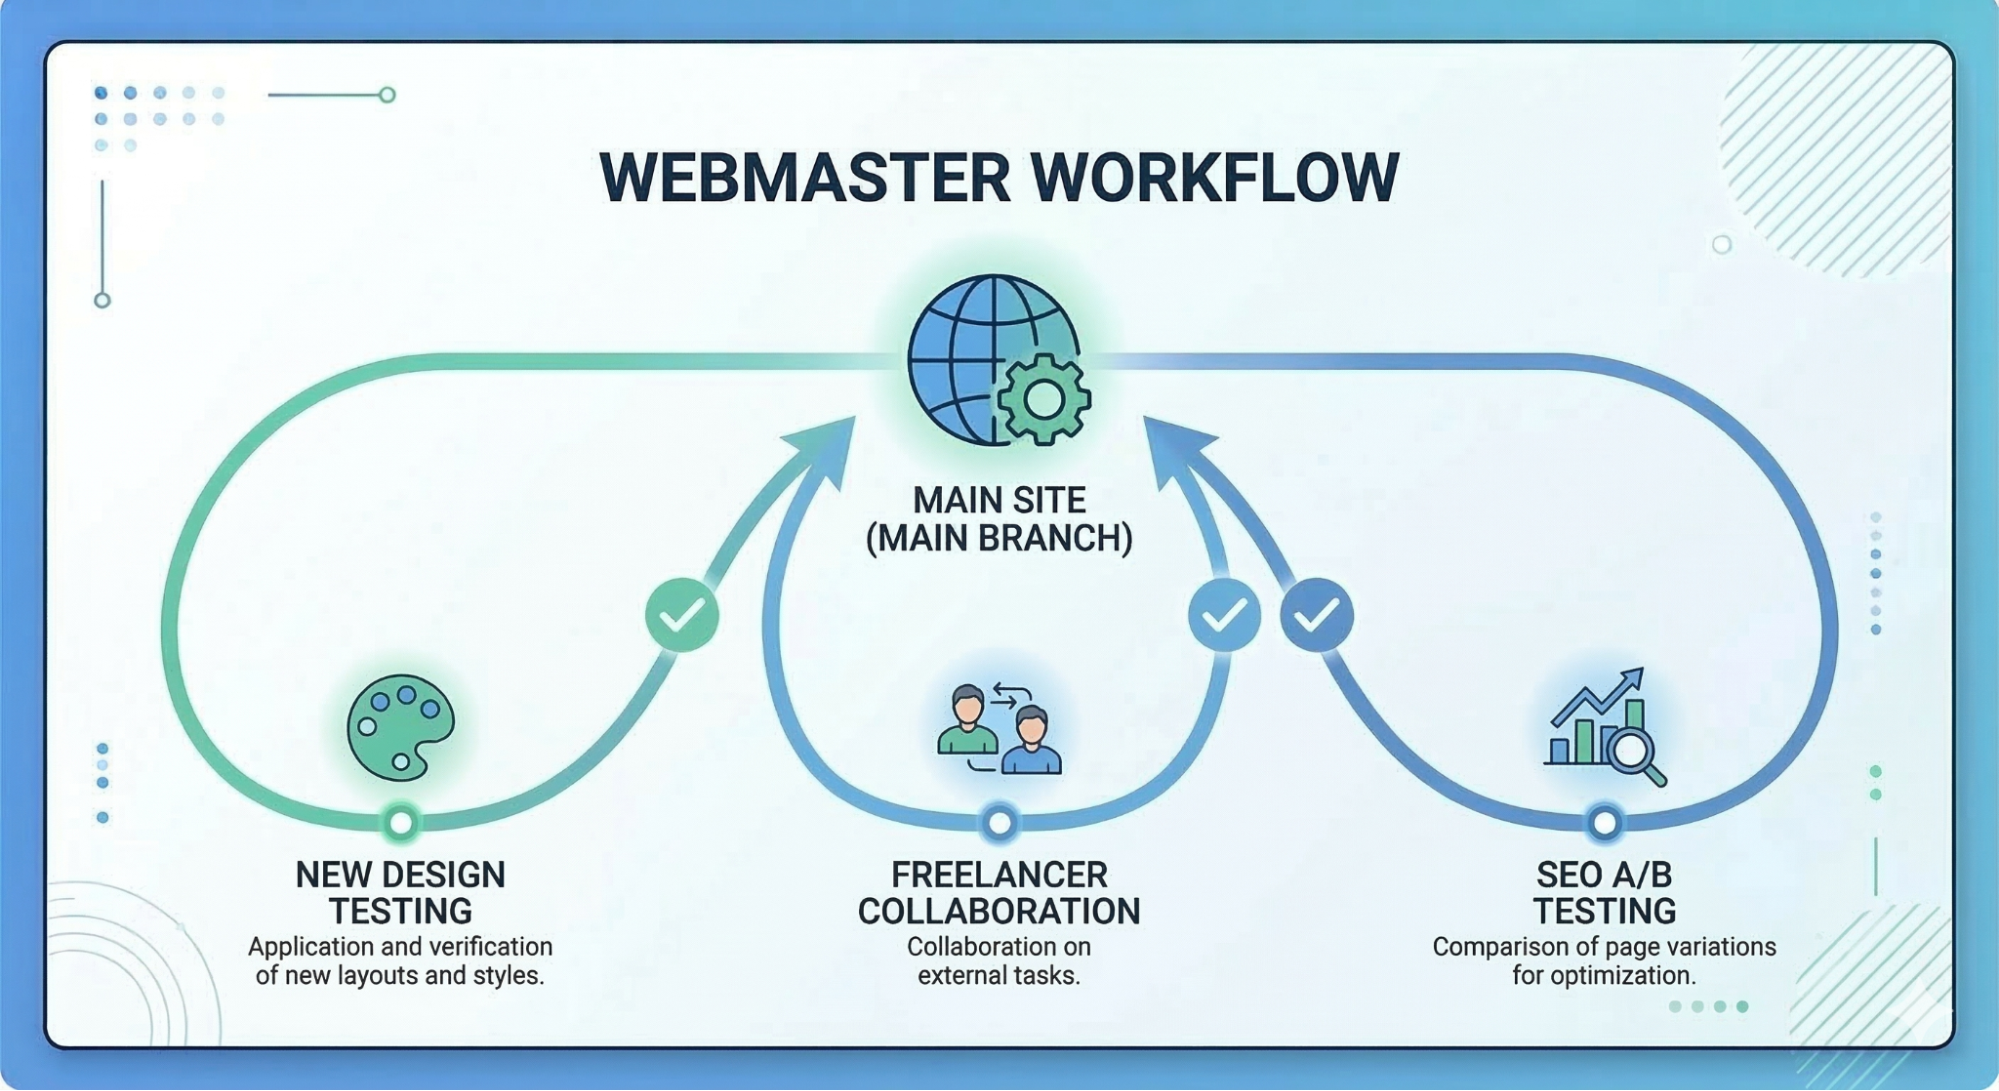
3.1. Safe Design and Code Experiments
Situation: You want to test a radically new landing page design but fear breaking the working version.
Without Git: You copy the entire folder, name it landing_new_design, work there. Then painfully transfer changes back manually if you like the design.
With Git:
git checkout -b new-design # Created branch for experiments
# Change anything, break things, rebuild
git checkout main # Don't like it? Returned to working version
The whole process takes 5 seconds instead of 30 minutes of copying files.
3.2. Working with Freelancers and Contractors
Situation: You hired a developer to finish the site. They ask for file access.
Without Git: You send an archive via email/Telegram. They work, send it back. You manually compare files, looking for what they changed. Half the changes turn out unnecessary, but it's unclear how it was before.
With Git:
# Freelancer creates their branch
git checkout -b freelancer-work
# Works, commits changes
# You see EVERYTHING they changed
git diff main freelancer-work
# Don't like something? They fix specific lines
# Everything great? Accept the changes
git merge freelancer-work
Plus complete history: who, when, and what changed. If something breaks a month later, it's easy to find the culprit.
3.3. Rolling Back After Errors
Situation: Updated a WordPress plugin or connected a new library—the site crashed. It's 11 PM, ad campaign launches tomorrow morning.
Without Git: Panic, trying to remember what exactly you changed, manual bug hunting until 3 AM.
With Git:
git log --oneline # Check recent changes
git checkout abc123 # Rolled back to version before update
Problem solved in 30 seconds. You'll figure out why the update broke things in the morning, but for now the old stable version works.
3.4. Syncing Between Computers
Situation: You work from desktop at home and laptop at cafes/coworking spaces.
Without Git: USB drives, Dropbox, Google Drive, constant confusion about "where's the newest version," file conflicts.
With Git:
# Morning on laptop
git pull # Grabbed changes from last night
# Work
git push # Sent to server
# Evening at home on desktop
git pull # Everything synced automatically
Always the current version, no manual file copying hassle.
3.5. Backup Without Hacks
Situation: Hard drive died / laptop stolen / accidentally deleted project folder.
Without Git: Hope you made backups. Usually didn't.
With Git + GitHub/GitLab: Entire project automatically stored in the cloud. Got a new laptop, typed one command—everything restored.
git clone https://github.com/username/my-landing.git
3.6. SEO Tasks and A/B Testing
Situation: You want to test two content variants for SEO.
With Git:
- Create branch
seo-test-variant-a - Create branch
seo-test-variant-b - Deploy each to subdomains
- See which ranks better
- Merge the winner into main branch
4. Where to Store Code: GitHub, GitLab, Bitbucket—What to Choose
4.1. What Are Git Repository Hosts
Important to understand the difference:
- Git — program on your computer that manages versions
- GitHub/GitLab/Bitbucket — cloud services where you can store repository backups
Analogy: Git is Microsoft Word, and GitHub is Google Docs (cloud document storage).
You can work with Git without any cloud, just on your local computer. But then there's no backup and no ability to work from other devices. That's why 99% of people use Git + one of the cloud services.
4.2. GitHub — Most Popular Choice
What it is: Largest platform for hosting Git repositories. Owned by Microsoft. Over 100 million users.
Pros for webmasters:
- ✅ Free private repositories (can store commercial projects, nobody sees them)
- ✅ GitHub Pages — free hosting for static sites (landing pages, portfolios)
- ✅ Huge library of ready solutions: templates, scripts, plugins
- ✅ Easiest community — easy to find answers
- ✅ Convenient web interface for editing right in browser
Cons:
- ❌ Owned by Microsoft (for those who dislike corporations)
- ❌ Sometimes blocked in certain countries
Price: Free for unlimited public and private repositories.
Conclusion: Optimal choice for 90% of webmasters.
4.3. GitLab — Open-Source Alternative
What it is: Open-source platform you can deploy on your own server or use the cloud version.
Pros for webmasters:
- ✅ Can deploy on your own server (complete data control)
- ✅ Built-in CI/CD in free version — automatic site deployment to hosting after each commit
- ✅ More generous free plan for teams
- ✅ GitLab Pages — analog of GitHub Pages
Cons:
- ❌ Smaller community than GitHub
- ❌ Interface slightly more complex for beginners
Price: Free with extended automation capabilities.
Conclusion: Choose if data privacy is important or you need deployment automation.
4.4. Bitbucket — For Jira Users
What it is: Platform from Atlassian (creators of Jira, Confluence, Trello).
Pros for webmasters:
- ✅ Tight integration with Jira (if you use it for project management)
- ✅ Free for teams up to 5 people
- ✅ Supports both Git and Mercurial
Cons:
- ❌ Smallest community
- ❌ Fewer features in free version
Price: Free for small teams, paid from $3/user for larger ones.
Conclusion: Makes sense only if already using Atlassian ecosystem.
5. Installing and Initial Git Setup
5.1. Installing Git on Different OS
Windows
Step 1: Go to the official site git-scm.com and download the Windows installer.
Step 2: Run the installer. You can leave default settings on all screens, but pay attention to two things:
- Default editor: If you don't know what to choose, leave Vim or switch to Notepad++/VS Code if installed
- PATH setup: Choose "Git from the command line and also from 3rd-party software"
Step 3: After installation, open command prompt (Win+R, type cmd) and check:
git --version
Should output something like: git version 2.44.0
macOS
Option 1: Via Homebrew (recommended)
If you have Homebrew installed:
brew install git
Option 2: Official installer
Download from git-scm.com and install like a regular app.
Installation check:
git --version
Linux (Ubuntu/Debian)
sudo apt-get update
sudo apt-get install git
Check:
git --version
5.2. Initial Git Configuration
After installation, you need to introduce yourself to Git—specify your name and email. This data will sign each of your commits.
Open terminal (or command prompt on Windows) and execute:
git config --global user.name "Your Name"
git config --global user.email "your@email.com"
Example:
git config --global user.name "Ivan Petrov"
git config --global user.email "ivan@example.com"
Important: Email should preferably be the same one you use on GitHub/GitLab—then commits will automatically link to your account.
Check settings:
git config --list
You'll see a list of all settings, including your name and email.
5.3. Creating Your First Repository
There are two scenarios: create a new project from scratch or turn an existing project into a Git repository.
Option 1: New project from scratch
# Create project folder
mkdir my-first-landing
cd my-first-landing
# Initialize Git repository
git init
What happened: a hidden .git folder appeared—this is the repository where all change history is stored.
Option 2: Existing project
If you already have a site folder:
# Navigate to project folder
cd /path/to/your/project
# Initialize repository
git init
Now your project is under Git control, but there are no commits yet. Let's create the first one!
# Create simple HTML file
echo "<h1>My First Landing</h1>" > index.html
# Add file to staging (prepare for commit)
git add index.html
# Create first commit
git commit -m "First commit: created index.html"
Congratulations! You just made your first commit. Now the project state is recorded, and you can always return to it.
6. Essential Git Commands: Minimum for Daily Work
6.1. File Lifecycle in Git
Before diving into commands, it's important to understand how Git sees your files. A file can be in one of four states:
- Untracked — new file Git doesn't know about yet
- Unmodified — file committed and hasn't changed since
- Modified — file changed after last commit
- Staged — file added to "commit list"
Typical workflow:
- Created/changed file (becomes Modified or Untracked)
git add— added to Stagedgit commit— recorded changes (file became Committed)- Changed file again → cycle repeats
6.2. Command #1: git status — What's Happening in the Repo
This is the most important command you'll use constantly. It shows the current repository state.
git status
Example output:
On branch main
Changes not staged for commit:
(use "git add <file>..." to update what will be committed)
(use "git restore <file>..." to discard changes in working directory)
modified: index.html
Untracked files:
(use "git add <file>..." to include in what will be committed)
style.css
no changes added to commit (use "git add" and/or "git commit -a")
What this means:
- You're on branch
main - File
index.htmlchanged but not yet added to staged - File
style.cssis new, Git doesn't know about it - No files ready to commit
Tip: Call git status after every action until you get used to it. This command doesn't break anything, just shows information.
6.3. Command #2: git add — Add Files to Staging
This command tells Git: "Prepare this file for the next commit."
Add one file:
git add index.html
Add multiple files:
git add index.html style.css script.js
Add entire folder:
git add css/
Add ALL changed files:
git add .
Important: The dot . means "current directory and all subfolders." Convenient, but be careful—you might accidentally add unwanted files.
6.4. Command #3: git commit — Save Changes
After files are added to staging, you need to commit them—record changes with a description.
git commit -m "Added contact form"
Flag -m means "message." The commit message should briefly describe what you did.
Examples of good commit messages:
✅ "Added contact form to homepage"✅ "Fixed bug with mobile menu"✅ "Optimized images for Core Web Vitals"
Examples of bad messages:
❌ "fix"❌ "zzz"❌ "asdf"❌ "changes"
Why this matters: In a month you'll browse commit history trying to understand what you changed. "Added contact form" is clear, "fix" isn't.
6.5. Command #4: git log — Change History
Want to see what you did before? Here's the history of all commits:
git log
Output:
commit a1b2c3d4e5f6g7h8i9j0 (HEAD -> main)
Author: Ivan Petrov <ivan@example.com>
Date: Fri Mar 15 18:30:00 2026 +0300
Added contact form
commit 9j8i7h6g5f4e3d2c1b0a
Author: Ivan Petrov <ivan@example.com>
Date: Fri Mar 15 16:45:00 2026 +0300
Created basic landing structure
This is the full version with details. But usually the short version is more convenient:
git log --oneline
Output:
a1b2c3d Added contact form
9j8i7h6 Created basic landing structure
Much more compact and clear!
6.6. Command #5: git diff — What Exactly Changed
Want to see specific code changes?
git diff
Shows all changes in files not yet added to staging.
Example output:
diff --git a/index.html b/index.html
index a1b2c3d..9j8i7h6 100644
--- a/index.html
+++ b/index.html
@@ -10,6 +10,10 @@
<h1>Welcome</h1>
<p>My first landing</p>
+ <form>
+ <input type="email" placeholder="Your email">
+ <button>Subscribe</button>
+ </form>
</body>
Green lines with + are additions, red with - are deletions.
Other useful variants:
git diff --staged # Changes in staged files
git diff HEAD # All changes since last commit
6.7. Command #6: git checkout — Switching and Rolling Back
This command has several functions:
1. Switching between branches:
git checkout main # Switch to main branch
git checkout new-design # Switch to new-design branch
2. Rolling back individual file:
git checkout -- index.html # Undo all changes in index.html
Warning: The second command irreversibly deletes all unsaved changes in the file. Use carefully!
3. Creating new branch and switching to it:
git checkout -b new-feature # Create branch and switch immediately
6.8. Command #7: git branch — Working with Branches
View branch list:
git branch
Output:
* main
new-design
test-feature
Asterisk * shows which branch you're currently on.
Create new branch:
git branch new-design
Delete branch:
git branch -d new-design # Delete if changes merged
git branch -D new-design # Force delete
6.9. Command #8: git merge — Combine Branches
Say you developed a new design in the new-design branch and want to merge it into the main main branch.
# First switch to the branch WHERE you're merging
git checkout main
# Merge changes FROM new-design branch
git merge new-design
If there are no conflicts (you didn't change the same lines in both branches), Git will automatically combine the changes.
7. Working with GitHub: Connecting Local Git to Cloud
Until now we've only worked locally, on your computer. Now let's learn to save projects to the cloud—on GitHub.
7.1. Creating GitHub Account
Step 1: Go to github.com and register.
Step 2: Confirm email.
Step 3: On the welcome screen you can skip all surveys (Skip)—they're optional.
7.2. SSH Key Setup (optional but recommended)
SSH key is needed so you don't enter login and password with every git push. It's safer and more convenient.
Generating SSH key:
ssh-keygen -t ed25519 -C "your@email.com"
Press Enter for all questions (can leave passphrase empty for simplicity, though with password is safer).
Copying key:
On Mac/Linux:
cat ~/.ssh/id_ed25519.pub
On Windows (in Git Bash):
cat ~/.ssh/id_ed25519.pub
Copy the entire output (starts with ssh-ed25519).
Adding key to GitHub:
- Go to GitHub settings: Settings → SSH and GPG keys
- Click "New SSH key"
- Paste copied key
- Save
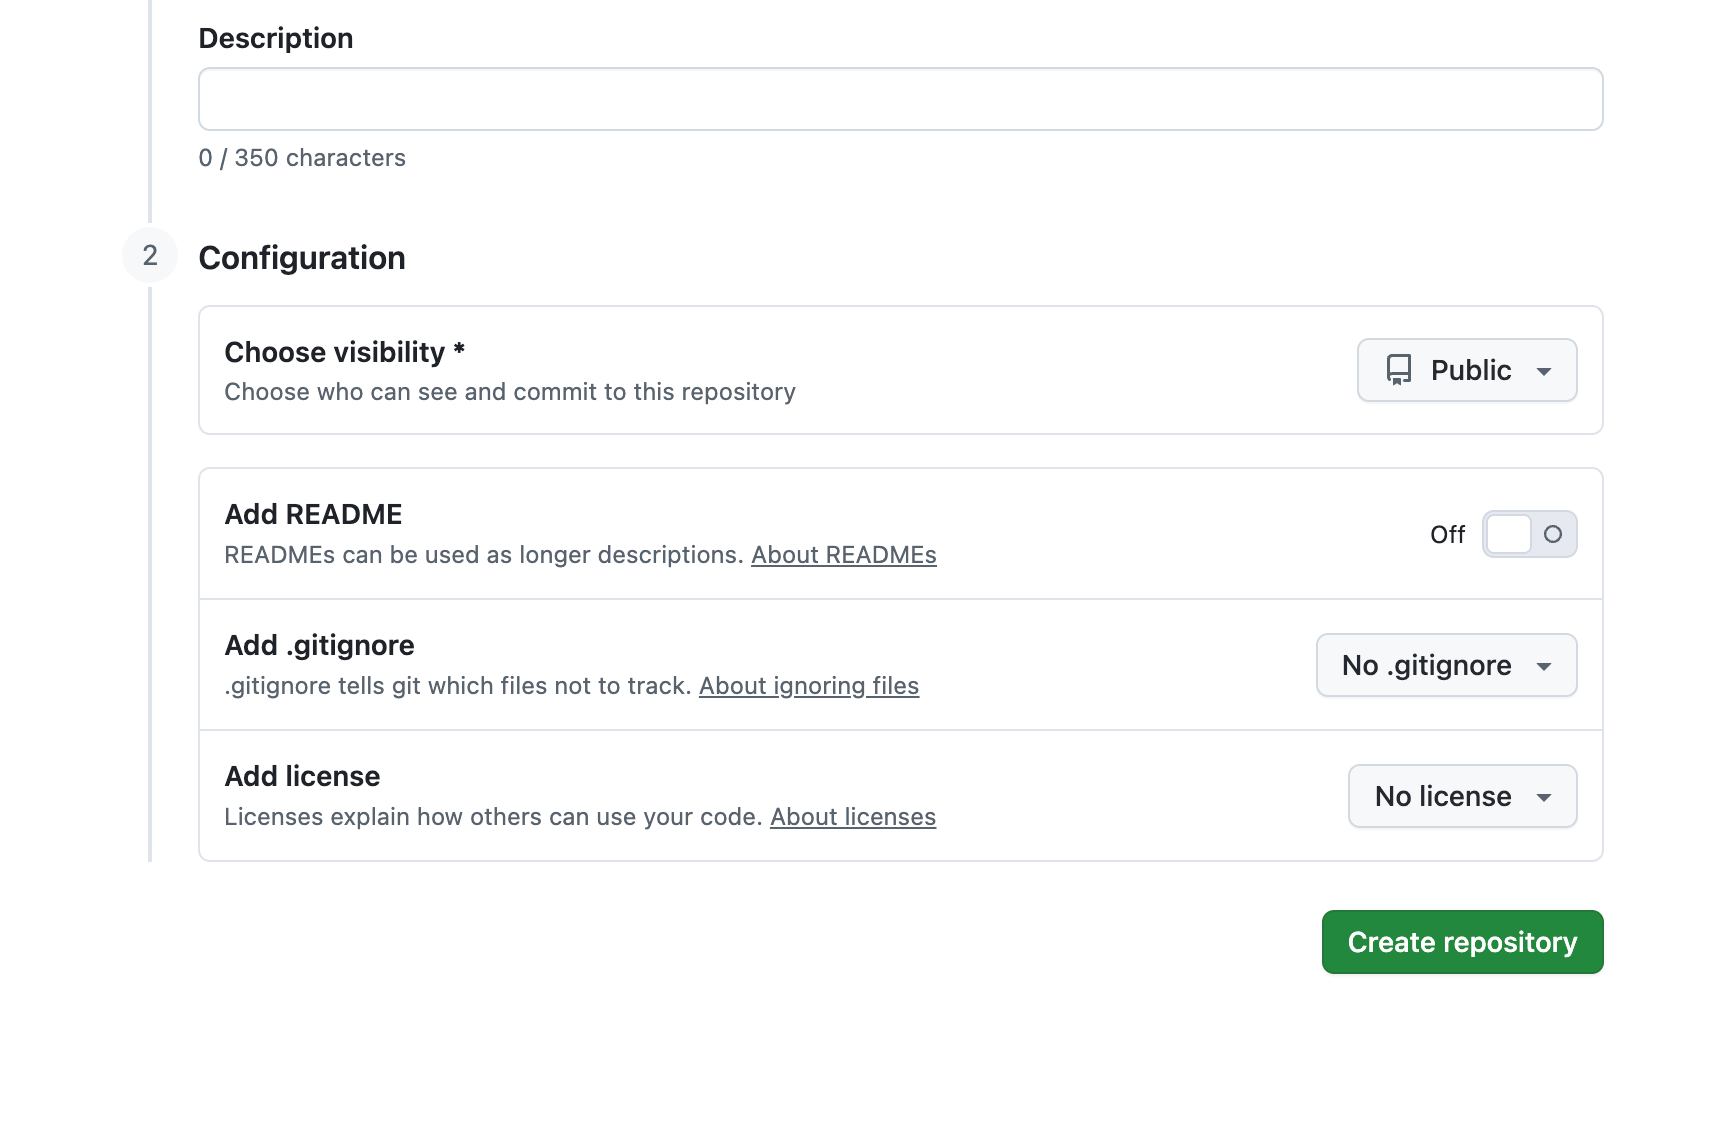
7.3. Creating Repository on GitHub
Step 1: On GitHub homepage click green "New" button or "+" icon → "New repository".
Step 2: Fill out form:
- Repository name:
my-landing(project name) - Description: "My first landing" (optional)
- Public/Private: Choose Private (only you see it)
- Initialize this repository with:
- ❌ DON'T check boxes (we already have local repository)
Step 3: Click "Create repository".
GitHub will show linking instructions. We need the block "…or push an existing repository from the command line".
7.4. Linking Local Repository with GitHub
Copy repository URL (will be either HTTPS or SSH—if you set up key, use SSH).
SSH URL example:
git@github.com:username/my-landing.git
HTTPS URL example:
https://github.com/username/my-landing.git
Link local repository with GitHub:
git remote add origin git@github.com:username/my-landing.git
origin is the name for remote repository (can name it anything, but origin is standard).
Send code to GitHub:
git push -u origin main
Flag -u (upstream) establishes connection between local main branch and remote main. After the first time you can just write git push.
Check: Refresh repository page on GitHub—you'll see your files!
7.5. Basic Daily Workflow
Now your typical workday looks like this:
Morning:
cd my-landing
git pull # Grab changes from GitHub (if worked from other device)
Working on project:
# Edit files...
git status # See what changed
git add . # Add all changes
git commit -m "Optimized images" # Commit
Evening:
git push # Send changes to GitHub
Now your code is in the cloud, safe!
7.6. Cloning Existing Repository
Want to download a project from GitHub to a new computer (or someone else's project)?
git clone git@github.com:username/my-landing.git
Or via HTTPS:
git clone https://github.com/username/my-landing.git
Git will create a folder with the repository name and download all files along with commit history.
8. Practical Scenarios for Webmasters
Now let's examine real situations you'll encounter in work.
Scenario 1: Testing New Landing Design
Task: Want to radically change homepage design but fear breaking the working version.
Solution via Git:
# 1. Create branch for experiments
git checkout -b redesign
# 2. Change design, edit CSS, HTML
# Work for several hours...
# 3. Commit changes
git add .
git commit -m "New homepage design"
# 4. Test. Open site locally, check.
# Don't like it?
git checkout main # Return to old version
git branch -d redesign # Delete unsuccessful branch
# Like it? Merge into main branch
git checkout main
git merge redesign # Now new design is main
git push # Send to GitHub
Result: You experimented safely without breaking anything. If you didn't like it, one command—and you're back to the working version.
Scenario 2: Rollback After Failed Update
Task: Updated WordPress plugin, site crashed. It's 11 PM, ad campaign launching tomorrow morning for $3000.
Solution:
# 1. Check commit history
git log --oneline
# Output:
# a1b2c3d Updated contact form plugin
# 9j8i7h6 Optimized loading speed
# 5f4e3d2 Added new client testimonials
# 2. See that before plugin update (commit 9j8i7h6) everything worked
# Roll back to this commit
git checkout 9j8i7h6
# 3. Check site — works!
# Make this commit the "official" current state
git checkout main
git reset --hard 9j8i7h6
# 4. Send to server
git push --force
Result: Restored working version in 2 minutes. In the morning you'll calmly figure out why the plugin update broke the site.
Important: git reset --hard and git push --force are powerful commands that rewrite history. Use them carefully, especially when working in a team.
Scenario 3: Working with Freelancer
Task: Hired a developer to finish responsive site version. Want to control their work and prevent breaking main code.
Solution:
# 1. Create separate branch for freelancer
git checkout -b freelancer-mobile
# 2. Give freelancer access to repository on GitHub
# (Settings → Collaborators → Add people)
# 3. Freelancer clones repository, switches to their branch
git clone git@github.com:username/my-landing.git
git checkout freelancer-mobile
# 4. Freelancer works, commits, pushes to their branch
git add .
git commit -m "Responsive menu for mobile"
git push
# 5. You check their work
git checkout freelancer-mobile
git pull
# Open site, test on different devices
# 6. If everything's ok — merge into main branch
git checkout main
git merge freelancer-mobile
# If something's wrong — ask to fix, they commit again to their branch
Result: Complete control over contractor's work. All change history saved. Main branch is safe.
Scenario 4: Syncing Between Computers
Task: Work from desktop at home and laptop at coworking/cafes.
On desktop (evening):
# Work on project
git add .
git commit -m "Added pricing section"
git push # Sent to GitHub
On laptop (next day):
git pull # Grabbed yesterday's changes
# Continue working
git add .
git commit -m "Finished pricing section"
git push
Evening at home on desktop:
git pull # Grabbed changes from laptop
# Continue working
Result: Seamless sync without USB drives, Dropbox, or confusion about "where's the newest version."
Scenario 5: A/B Testing for SEO
Task: Want to test two headline variants and content structure to understand which ranks better.
Solution:
# 1. Create branch for variant A
git checkout -b seo-variant-a
# Edit content, headlines
git add .
git commit -m "SEO variant A: focus on keywords"
# 2. Return to main branch and create variant B
git checkout main
git checkout -b seo-variant-b
# Edit differently
git add .
git commit -m "SEO variant B: focus on natural text"
# 3. Deploy each branch to different subdomains or test pages
# variant-a.example.com
# variant-b.example.com
# 4. After 2-4 weeks check analytics
# Variant A wins? Merge it into main branch
git checkout main
git merge seo-variant-a
git push
Result: Scientific approach to SEO optimization. Can always return to any variant.
9. Graphical Interfaces for Git
Scared of command line? There are visual programs for working with Git.
9.1. GitHub Desktop (recommended for beginners)
What it is: Official app from GitHub with simple interface.
Pros:
- ✅ Very simple and clear interface
- ✅ Free
- ✅ Works on Windows and macOS
- ✅ All main operations (add, commit, push, pull, branch, merge) in one click
Where to download: desktop.github.com
Main actions in GitHub Desktop:
- Commit: Select changed files with checkboxes, write message at bottom, click "Commit"
- Push: "Push origin" button at top
- Pull: "Fetch origin" button, then "Pull"
- Create branch: Repository → New branch
- Switch branches: Dropdown at top
9.2. GitKraken
What it is: Powerful Git client with beautiful branch visualization.
Pros:
- ✅ Beautiful interface
- ✅ Branch visualization as tree (very visual)
- ✅ Built-in conflict editor
- ✅ Works on Windows, Mac, Linux
Cons:
- ❌ Free only for public repositories
- ❌ Private repos need paid version ($4.95/month)
Where to download: gitkraken.com
9.3. Sourcetree
What it is: Free Git client from Atlassian (Bitbucket creators).
Pros:
- ✅ Completely free
- ✅ Supports GitHub, GitLab, Bitbucket
- ✅ Powerful functionality
Cons:
- ❌ Interface more complex than GitHub Desktop
- ❌ Requires Atlassian account registration
Where to download: sourcetreeapp.com
9.4. VS Code — Built-in Git
If you edit code in Visual Studio Code, Git is already built in!
How to use:
- Open folder with project (File → Open Folder)
- Left panel has Source Control icon (three dots with lines)
- All changed files display there
- Click + next to file =
git add - Write commit message at top, click checkmark =
git commit - Three dots → Push =
git push
Our recommendation:
- Beginners: GitHub Desktop — easiest start
- Visual learners: GitKraken — beautiful branch structure view
- Already use VS Code: Built-in Git — everything at hand
- Over time: Learn terminal — it's faster and more powerful
10. Common Beginner Mistakes
Mistake 1: Infrequent Commits
❌ Bad: Work for a week, change 50 files, make one huge commit with message "updates".
Problems:
- Impossible to roll back only part of changes
- Unclear what exactly was done
- If something broke, hard to find cause
✅ Good: Commit after each logically complete piece of work.
Examples of logical pieces:
- Added testimonials section → commit
- Fixed form bug → commit
- Optimized images → commit
Rule of thumb: If you can describe changes in one sentence—it's a good commit.
Mistake 2: Meaningless Commit Messages
❌ Bad:
git commit -m "fix"
git commit -m "zzz"
git commit -m "asdf"
git commit -m "changes"
git commit -m "update"
✅ Good:
git commit -m "Fixed signup form bug on mobile"
git commit -m "Added client testimonials section"
git commit -m "Optimized images for Core Web Vitals"
git commit -m "Updated color scheme per brand guide"
Tip: Imagine in 3 months you'll need to find when you added a specific feature. Which commits will you search through?
Mistake 3: Forget to git pull Before Working
Scenario: Worked evening on laptop, pushed changes. Morning sat at desktop, started working WITHOUT git pull.
Result: By evening try to push—Git complains: "your branch is behind remote."
Conflict resolution:
git pull # Grab remote changes
# If conflicts, Git will say in which files
# Open file, see conflict markers:
<<<<<<< HEAD
Your version of code
=======
Version from GitHub
>>>>>>> origin/main
# Manually choose needed version, delete markers
git add .
git commit -m "Resolved merge conflict"
git push
Prevention: Always start workday with git pull.
Mistake 4: Committing Confidential Data
❌ Disaster:
# File config.php with database password
git add config.php
git commit -m "Added config"
git push # Passwords leaked to public repository!
What can leak:
- Database passwords
- API keys (Google Maps, Stripe, SendGrid)
- OAuth tokens
- SSH keys
- Email/passwords for FTP
Solution: Use .gitignore.
Mistake 5: Not Using .gitignore
.gitignore is a file where you list files and folders Git should ignore.
Example .gitignore for webmaster:
# Dependencies
node_modules/
vendor/
# Confidential files
.env
config.php
wp-config.php
.htpasswd
# Logs and caches
*.log
cache/
logs/
# System files
.DS_Store
Thumbs.db
desktop.ini
# Backups
*.bak
*.backup
*~
# Editor temp files
.vscode/
.idea/
*.swp
*.swo
How to create:
# In project root
touch .gitignore
# Open in editor, paste list above
git add .gitignore
git commit -m "Added .gitignore"
Now Git will ignore these files even if you do git add ..
11. Advanced Features for Power Webmasters
11.1. GitHub Pages: Free Hosting
GitHub provides free hosting for static sites (HTML, CSS, JS without server side).
How to activate:
- Go to repository on GitHub
- Settings → Pages
- Source: choose
mainbranch and/rootfolder (or/docs) - Save
In a couple minutes site will be available at:
https://username.github.io/repository-name/
Custom domain:
Can attach your own domain (e.g., mysite.com):
- Create
CNAMEfile in repository root with contents:mysite.com - In domain settings (at registrar) add CNAME record:
www CNAME username.github.io
Applications:
- Portfolio
- Landing pages for testing
- Project documentation
- Simple promo sites
11.2. Git Hooks: Automation
Git Hooks are scripts that run automatically at certain events (before commit, after push, etc.).
Example: automatic code check before commit
Create file .git/hooks/pre-commit:
#!/bin/sh
# Check if code has TODO word
if git diff --cached | grep -i "TODO"; then
echo "Error: code has TODO left. Fix before commit."
exit 1
fi
echo "Code clean, commit allowed."
exit 0
Make file executable:
chmod +x .git/hooks/pre-commit
Now if code has TODO, Git won't allow commit.
Other applications:
- Automatic CSS/JS minification before commit
- Code syntax checking
- Running tests
- Sending Telegram notifications on push
11.3. GitHub Actions: Deploy Automation
GitHub Actions is a built-in CI/CD system. Can set up automatic deploy to hosting after each push.
Example: auto-deploy to VPS via FTP
Create file .github/workflows/deploy.yml:
name: Deploy to Server
on:
push:
branches: [ main ]
jobs:
deploy:
runs-on: ubuntu-latest
steps:
- uses: actions/checkout@v2
- name: FTP Deploy
uses: SamKirkland/FTP-Deploy-Action@4.0.0
with:
server: ftp.yourserver.com
username: ${{ secrets.FTP_USERNAME }}
password: ${{ secrets.FTP_PASSWORD }}
local-dir: ./
Secrets (FTP login/password) are added in Settings → Secrets → Actions.
Result: Did git push → in a minute site automatically updated on hosting.
Other applications:
- Automatic image optimization
- Compiling SCSS to CSS
- JS minification
- Generating sitemap.xml
- Sending deploy notifications
12. Checklist: Ready to Use Git
Go through this list. If all items are ✅ — you've mastered Git basics!
- [ ] Installed Git on computer and checked version (
git --version) - [ ] Set name and email (
git config --global user.name/email) - [ ] Created GitHub account
- [ ] Created first local repository (
git init) - [ ] Made first commit (
git add + git commit) - [ ] Viewed commit history (
git log) - [ ] Created branch and switched to it (
git branch + git checkout) - [ ] Merged branch back into main (
git merge) - [ ] Created repository on GitHub
- [ ] Linked local repository with GitHub (
git remote add origin) - [ ] Pushed code to GitHub (
git push) - [ ] Created
.gitignorefile and added confidential files - [ ] Wrote meaningful commit message (not "fix")
- [ ] Understood difference between
git add,git commit, andgit push - [ ] Rolled back file to previous version (
git checkout -- filename)
Bonus points for advanced:
- [ ] Set up SSH key for GitHub
- [ ] Published site via GitHub Pages
- [ ] Used GitHub Desktop or other GUI client
- [ ] Resolved merge conflict
- [ ] Set up Git Hook or GitHub Action
13. Conclusion: What's Next
Congratulations! You've gone from complete beginner to confident Git user.
Main things to remember:
- Git isn't hard, it's just unfamiliar the first couple days. After a week of use, Git will become so natural you won't understand how you worked without it.
- Don't fear experimenting. Git is created precisely so you can experiment without fear of breaking things. You can always roll back.
- Commit often. Better 10 small commits than one huge one. Each commit is a save point you can return to.
- Use branches. Main branch (main) should always work. All experiments—in separate branches.
- Write clear commit messages. In a month you'll thank yourself.
Useful Resources:
Interactive learning:
- learngitbranching.js.org — visual interactive Git tutorial
- githowto.com — step-by-step practical guide
Documentation:
- git-scm.com/book/en/v2 — official Pro Git book (free)
- docs.github.com — GitHub documentation
Cheat sheets:
- GitHub Git Cheat Sheet — PDF with all basic commands
Right now:
- Open terminal
- Navigate to your current project folder (any!)
- Execute:
git initgit add .git commit -m "First commit: starting project versioning"
Congratulations! Your project is now protected by Git. In a month you'll look at commit history and smile—what a joy to see the entire development path of the project.
And in three months you'll wonder how anyone can work on a site without Git. Welcome to the world of professional development!
Share this article
Send it to your audience or copy an AI-ready prompt.